Vinyl Wall Wraps are an affordable yet impactful way to transform the walls of your school’s hallways, classrooms, weight rooms, locker rooms, theatre, and other spaces.
Let us help you custom design your wall wraps with your school colors, logo, graphics, and/or photos!
For use on smooth or cinder block wall or drywall that has been primed and painted. Recommended for interior walls with a life expectancy of 10 years. Outside walls have a guarantee of 1 year. Vinyl Wall Wraps allow you to maintain the surface behind the walls.
We will ask you about the basic direction for your project – what space you'd like to brand, and ask about your logo's; school colors (PMS#’s); photos, core values; character words, ect. Our Professional Design Team will take over from there.
Once you've committed to your purchase you may provide us with photos of the various areas of your school you would like to brand and we will superimpose the new graphics on them to show you how they will look for your review.
Our Creative Design Team is second to none and will make sure their professional concept and design meet your approval!
Once approved, your product will be produced and our certified installers will come to your school to install it.
Measuring your school walls for Wall Wrap is a simple process. Just follow the guidelines detailed below. Feel free to contact us with any questions!
If you will be using our design team to create your design they will need some information from you such as;
Your school logo in vector form, (a vector file will typically have a .ai or .eps extension)
Your school colors, (Pantone numbers please)
If your school has a required font please let us know
Any verbiage you want to use such as character words or school slogans. In situations where you want to use photos, we'll ask for high-resolution photos.
If you are going to create your own design the following guidelines are designed to save you time, effort and avoid any additional file set up charges. Correct preparation of your files is crucial to meeting deadlines.
Software Accepted:
We use Macintosh versions of the following software. In most cases, we can work with artwork created by PC versions of the same programs. Adobe CC: InDesign, Illustrator, and Photoshop
Document Setup:
It is important to call BEFORE starting your design if you have not worked with a specific process before. Request specifications for the specific product you are designing.
-If your graphic contains photos as well as logos, copy or line-art, set up your document as a page layout in InDesign or Illustrator.
-When creating a display that stretches across multiple panels, always set your file up as one continuous layout.
-Include bleed for trimming on all of your graphics. See the bleed specifications for your particular product.
-Files may be created at any scale as long as the proportions are correct.
-Indicate any cutouts or die lines on a separate layer in your layout.
-Provide us with a cut path for complex or custom cutouts in vector format.
-Do a Collect or Package to gather correct fonts and linked/placed images. Convert all text to outlines if you are not providing us with the fonts used in your files.
We always request artwork is sent in its native format with all links and fonts included. Programs like InDesign offer the option of exporting your layouts as self-contained PDF files for output. We will require approval of these non-native files to print “as is” with no color adjustments (we will need to “rasterize” or flatten these PDF’s).
-Avoid using auto trace options or making clipping paths using magic wand selections. These typically are not clean and smooth. Taking the time to draw your paths will produce the best outcome.
-If you have specific colors you would like matched, do not use a transparency or opacity feature to achieve a certain color. Instead, assign a color value or use a tint.
-Creating gradients in InDesign or Illustrator can cause banding on the final output. Please create gradients in Photoshop and link them into your page layout program.
Color Matching:
It is almost impossible to match provided laser prints when doing image color correction. Please understand that color is device-dependent. The same digital color will print differently on different output devices and media.
-Use PMS (Pantone Matching System) Solid Coated numbers for specifying vector file colors.
We will adjust spot colors to the closest possible match for the output device and media.
-If we will be matching against something other than a PMS color, make sure the sample is large enough.
-Please keep all color profiles consistent across your project's collateral images. Mismatched profiles can cause unexpected color shifting and/or inconsistent output. New files will be requested if color spaces do not match.
-If color needs to be consistent with a previous order please include this information on your purchase order.
-For color matching in Photoshop fie, all artwork must remain in a layered format.
-If a Pantone color is specified but coated or uncoated is not, our default is coated.
-Colors such as fluorescents, neons, and metallics cannot be replicated. Please choose a complimentary standard Pantone color.
Bleed:
It is very important to provide us with the appropriate amount of bleed. If you fail to provide us with the accurate amount of bleed our art department will contact you requesting new files. That could jeopardize your deadline. Design elements should not be positioned too close to the outer edges of the document. If your output is on fabric and the material shrinks during heat transfer, those design elements could be cut off.
-All fabric requires 2 inches of bleed on all sides beyond the final trim size, 4 inches total.
-Prints on canvas material that is to be stretched onto a frame require 2 inches of bleed on all sides beyond the trim size, 4 inches total.
-All other materials require a 1/2 inch of bleed on all sides beyond the trim size, 1 inch total.
-Billboards require 6 inches of bleed on all sides beyond the trim size, 12 inches total.
*when bleed is not provided on billboards the image will be shrunk down to have a solid 4” border on each side using a complementary color.
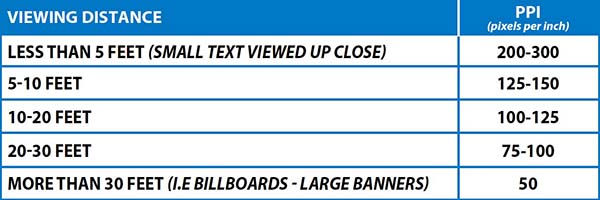
Image Resolution:
Resolution specifications apply only to raster files. To maximize image quality do not rasterize vector graphics or fonts. Follow the guide below and get as close as you can to this resolution, file size permitting.
Viewing Distance Chart
Click here to download a copy of these detailed art guidelines.